Adding and editing transactions
Add a deposit, withdrawal or transfer, split a receipt across categories, find any entry, and edit, delete, restore or copy it.
A transaction is one movement of money: a Deposit coming into one of your accounts, a Withdrawal going out of one, or a Transfer between two of your own accounts. The Transactions screen lists every one you’ve committed, and it’s where you add, find, change, delete and copy them.
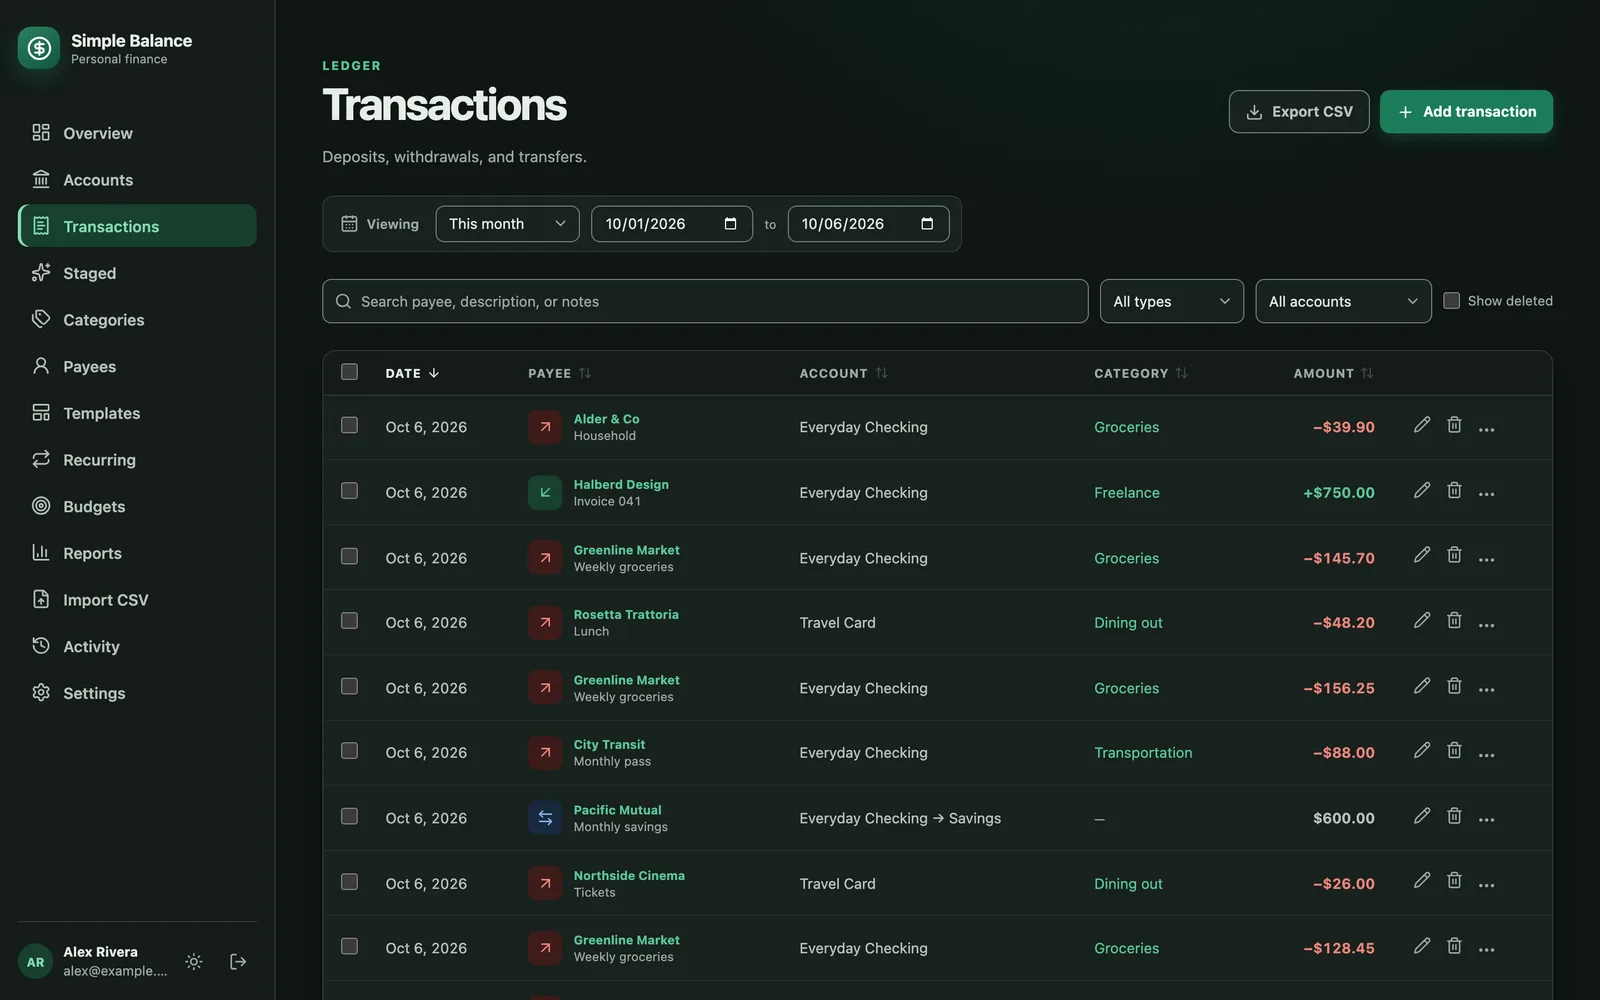
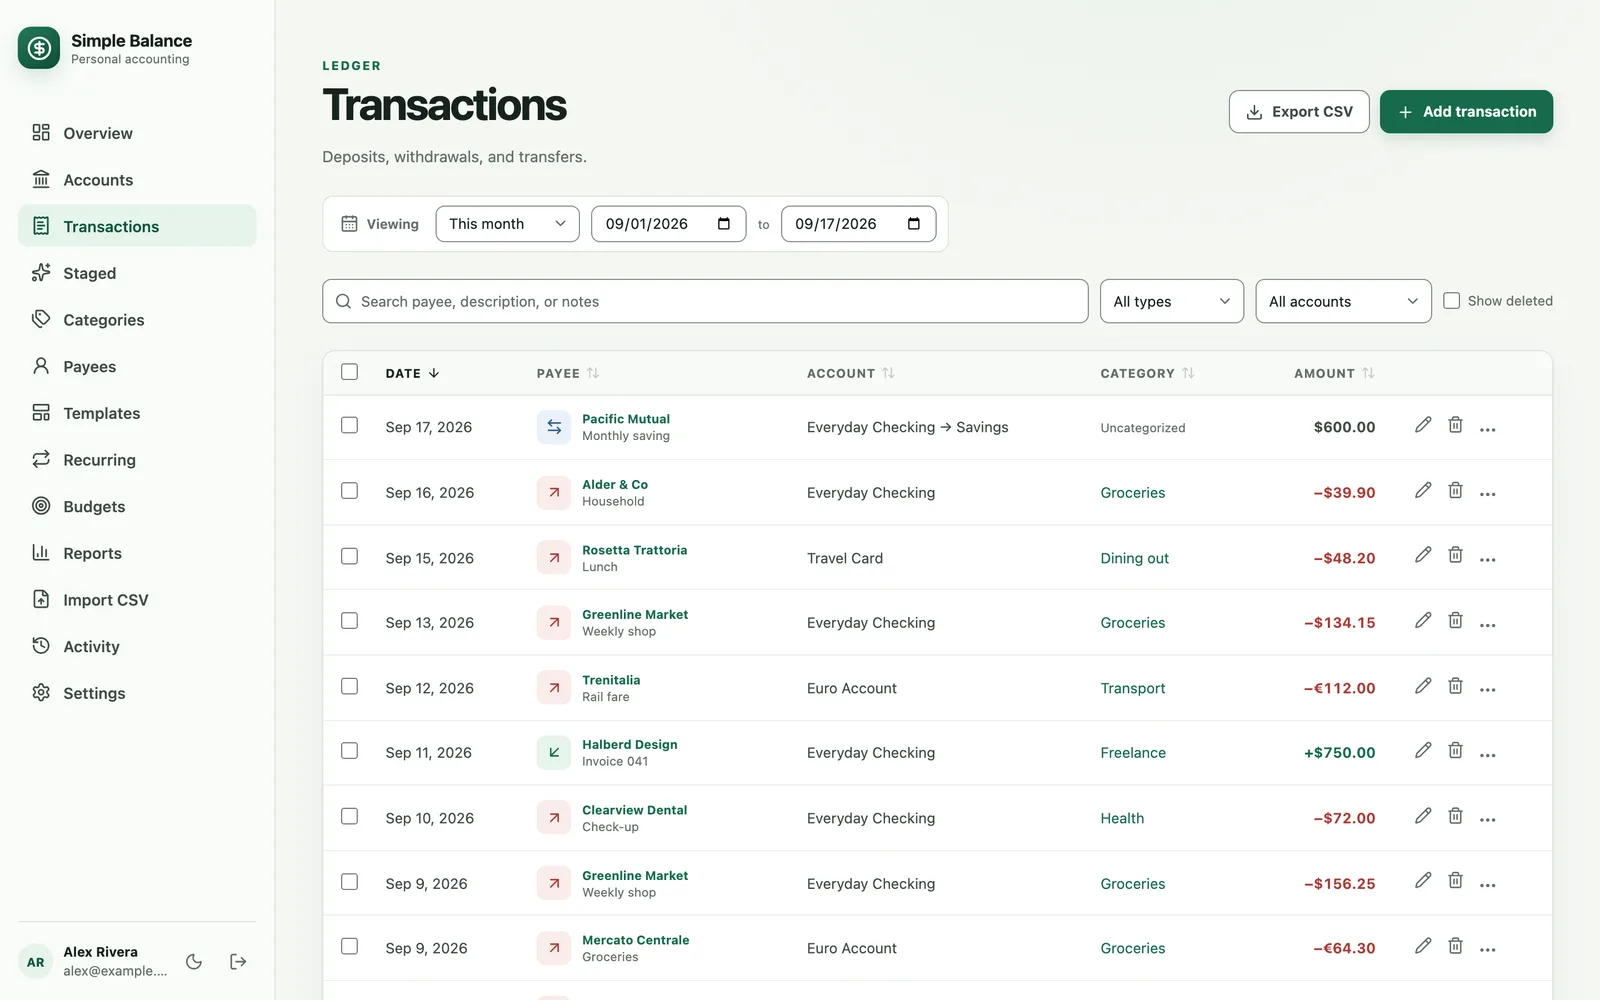
The money in this picture is made up. It’s the real product, filled with example spending.
Add a transaction
- Press Add transaction on Transactions or Overview. The button stays off until you have an account, and says “Create an account first.”
- Choose the type: Withdrawal for money spent or removed, Deposit for money received or added, or Transfer to move money between two of your accounts. A new entry starts on Withdrawal.
- Fill in the fields below. Only the date, the payee, the account and the amount are required.
- Under What should happen next?, choose Commit now or Stage for review.
- Press Commit transaction, or Stage transaction if you chose to stage it.
| Field | What goes in it |
|---|---|
| Date | The day the money moved. It starts on today, in your own timezone. |
| Payee | Who the money went to or came from, up to 160 characters. It suggests payees you’ve used before, and a name that matches one of them, whatever its capitalization or spacing, switches to the spelling you already have, so one store doesn’t end up under three names. |
| Account | The account the money left, for a withdrawal, or arrived in, for a deposit. Each choice shows the account’s currency. Archived accounts aren’t offered, and neither are accounts the free plan has frozen. |
| Amount | Always a positive number. The type already says which way the money went. The label names the account’s currency, like Amount (USD). |
| Description | Optional. A short line about what it was, up to 240 characters. It shows under the payee in the list. |
| Category | Optional. What the money was for, such as Groceries or Salary. Left blank, the entry shows as Uncategorized. See Choose a category. |
| Notes | Optional. Anything longer you want to keep with it, up to 4,000 characters. The search box reads notes, so a reference number written here can be found later. |
Choose a category
Type in Category to pick one of your categories. A name you already have matches whatever its capitalization. A name you don’t have yet gets a note under the field, such as Saving will add “Coffee” as a new category, and the category is created when you save.
When the name is new, the form also asks what kind of category it is:
- On a deposit: Money you earned, or A refund of money you spent.
- On a withdrawal: Money you spent, or Paying back money you earned.
The first answer is the usual one. The second is how you record a refund: a store giving you money back is a deposit filed under the spending category it came out of, and it lowers that spending instead of counting as income. How deposits, withdrawals and transfers work explains why. A category you already have keeps its kind, so a deposit into an existing spending category is a refund without being asked.
One entry can’t be both income and a refund. A split deposit naming an income category and a spending category at once is refused with “A deposit is either income or a refund, not both. Enter it as two transactions.” A split withdrawal naming both gets “A withdrawal is either spending or income coming back, not both. Enter it as two transactions.” Either way, the save button stays off until you fix it.
Choosing categories for your own spending is its own question. Budget categories is a plain guide to it.
Commit now or stage for review
- Commit now puts the transaction in the books straight away. It counts toward balances, reports and budgets from its date.
- Stage for review keeps it out of every balance and puts it on Staged, where it waits until you commit it.
Stage one when you aren’t sure of it yet, such as a pending card charge whose amount might change. Imported rows, recurring transactions and anything an AI assistant prepares all arrive on Staged too. Staged transactions covers the queue.
Enter several in a row
Below the commit choice are two checkboxes for when you have a pile of receipts:
- After saving/staging, return to create another keeps the form open after you save, with a line saying “Transaction committed. Create another when ready.” or, if you staged it, “Transaction staged. Create another when ready.”
- Reset after saving/staging, which appears once the first is on, empties the form after each save. Leave it off to keep what you typed, so you only change what differs from one entry to the next.
If you commit the same date, payee, account and amount twice, the second is refused as a duplicate until you confirm it. See When it looks like a duplicate.
Start from a template
Once you have a template, the form opens with Start from a template. Pick one and it fills in whatever the template holds, such as the payee, the account, the amount or the category, and leaves the rest for you. Choosing a different template, or No template, first puts back whatever the last one filled in.
Anything you change in the form stays in this transaction. The template isn’t touched. If the template names an account or a category you’ve since archived or deleted, the form doesn’t use it and says so, for example This template’s account is no longer available. Choose again before saving. Check that field and pick what you want before you save.
The picker is on the edit form as well, so you can fill an existing entry in from a template. Templates covers making them.
Record a transfer
A transfer moves money between two accounts you hold, like paying a credit card from checking or putting money into savings. It’s one entry, not a withdrawal plus a deposit, and it never counts as income or spending.
- Choose Transfer.
- Pick the From account the money left and the To account it arrived in. They have to be different accounts.
- Enter the Amount sent.
- Press Commit transaction.
A transfer has no category, so the field isn’t shown. In the list, its Account column reads like “Checking → Savings” and its Category column shows a dash.
Between two currencies, an Amount received field appears beside the amount sent. Enter what actually arrived, and the rate between the two is saved with the transfer. In the list, the amount received shows under the amount sent. More than one currency says more.
Split one receipt across categories
One payment can cover several categories, such as a supermarket trip that was partly groceries and partly household supplies.
- Enter the Amount first.
- Under Category, press Split across categories. The category you’d chosen becomes the first row, holding the whole amount, and a second row appears.
- In each row, choose a category, enter how much of the total it gets, and add a note if you like.
- Press Add a category for another row, or Remove to drop one.
- Save when the line under the rows says The split adds up.
The line keeps count as you type. It reads “$12.50 left to assign.” while some of the total has no category, “$4.00 more than the total is assigned.” when the rows add up to too much, and “Enter an amount for the transaction and for each category.” until there’s an amount to divide. The save button stays off until it adds up, and says “The split has to add up before this can be saved.”
- A split can name up to 50 categories. At 50, Add a category turns off.
- Removing rows until only one is left turns the split back into a single category.
- A transfer can’t be split, because it has no category.
In the list, a split shows its biggest category with a Split · 3 badge counting its categories. On a category’s own page, the row shows only that category’s share of it.
Find a transaction
The list shows 50 transactions a page, newest first, and the line under it reads like “Showing 1–50 of 312 transactions”. The arrows and page numbers beside it move between pages.
- Viewing sets the dates. It starts on This month. Choose All time to see everything, or pick a start and end date. Finding your way around covers the date bar.
- Search transactions finds text anywhere in the payee, the description or the notes, ignoring capitalization. It only looks inside the dates you’re viewing, so choose All time to search everything.
- The type menu, which starts on All types, narrows the list to Deposits, Withdrawals or Transfers.
- The account menu, which starts on All accounts, narrows it to one account.
- Show deleted adds the transactions you’ve deleted, marked Deleted.
Click a column heading, Date, Payee, Account, Category or Amount, to sort by it, and click it again to reverse the order.
There’s no category or amount filter on this screen. To see one category’s transactions, click the category’s name in any row, which opens its page. Clicking a payee’s name does the same for that payee. Both pages show the same list, narrowed to that category or payee.
Edit a transaction
- Press the pencil at the end of the row. Edit transaction opens with the same form, filled in.
- Change what you need. You can change the type, the accounts, the amount and the category as well as the words.
- Press Save changes.
Nothing is overwritten. The books record the difference between the old entry and the new one, and saving without changing anything records nothing. How deposits, withdrawals and transfers work explains this.
If an edit moves the last transaction off a category, and no budget, template, recurring transaction or staged row uses that category either, the category is removed along with the edit.
A deleted transaction has no pencil. Restore it first, then edit it.
Delete and restore a transaction
- Press the trash can at the end of the row.
- Delete this transaction? asks you to confirm. It says the entry stops counting toward balances and reports, and that nothing is erased.
- Press Delete transaction.
To bring one back, turn on Show deleted, find the row marked Deleted, and press the restore button (a curved arrow) at the end of it. It counts toward balances again straight away.
Restore works one transaction at a time. There’s no way to restore a whole selection at once, which matters after deleting many at once.
If restoring would make the entry an exact match for one you’ve added since, it’s refused as a duplicate, with a Restore anyway button for when both are real.
When it looks like a duplicate
Committing an entry that exactly matches one already in the books is refused with “This transaction appears to be a duplicate”. Exactly means the same type, date, account, amount and payee, with the payee’s capitalization and spacing ignored, or the same bank reference from an imported statement. The category, description and notes don’t count, and neither do deleted transactions.
Sometimes both are real, like two coffees at the same price on the same day. Press Commit anyway and it’s saved. The same check runs when you edit an entry so that it matches another.
Staged uses a looser test, since it’s looking for the same payment recorded twice: the same account, direction and amount, dated within three days of each other. Staged transactions covers it.
Copy a transaction
Open the ⋯ menu at the end of a row and choose Clone transaction.
Stage a transaction opens, filled in from the original, including its date, and set to Stage for review. Change whatever differs, usually the date, then press Stage transaction. To skip the queue, choose Commit now before saving.
The copy leaves the original’s bank reference behind, so importing that statement again still recognizes the original. A copy committed with nothing changed matches the original exactly, so it’s refused as a duplicate until you press Commit anyway.
Save it as a template or a recurring transaction
The same ⋯ menu has two more choices.
- Save as template saves the entry as a starting point for the next one like it. It keeps the type, payee, accounts, amount, category or split, description and notes, and leaves out the date, the bank reference and, on a transfer between two currencies, the amount received. Give it a Template name and clear any field you’d rather fill in each time. Templates covers the rest, including email reminders.
- Save as recurring transaction puts the same entry on a schedule. Give it a Name, and it adds a row to Staged on each due date and records nothing until you commit it. The entry’s date becomes the schedule’s Starting date, and the schedule starts as monthly, so it repeats on that same day of the month. Nothing dated before today is ever proposed. Recurring transactions covers schedules.
Transactions dated in the future
You can date a transaction after today, like a bill you’ve already scheduled. The Overview, Reports and Budgets leave it out until its date arrives.
Most date ranges end today, This month included, so a future transaction isn’t in the list until you choose All time or a custom range that reaches its date. An account’s own page counts it in Future balance, and in Ending balance when your dates reach past today.
Export what you’re looking at
Export CSV saves the transactions the list matches as a spreadsheet file: the dates you’re viewing, the search, the type and the account. It saves them newest first. Deleted transactions are never exported, even with Show deleted on.
One export holds up to 100,000 rows. Past that, it stops with “Export exceeds 100,000 rows. Narrow it with a start and end date and export one range at a time.” Taking your data with you says what a file holds and what it leaves out.
The same list on other pages
Each account, category, payee and template has its own page, and each has this same list, narrowed to that one thing, with the same search, filters, row buttons and Export CSV. Add transaction there starts with that account, category or payee already filled in.
Category, payee and template pages also list matching staged rows above the others, marked Staged, with a Review link that opens Staged. They don’t count toward anything yet, and they can’t be selected there.
Frozen accounts
The free plan keeps 3 accounts in use at once. If Premium ends while you’re using more, the others are frozen. A row that touches a frozen account shows Frozen in its Account column, and its edit, delete and restore buttons are off, with the reason when you point at them. You can still see it, and it still counts in your totals. Your account and plan explains when it happens and how to undo it.